- Agent — The AI features, UI, and browser automation (TypeScript/React)
- Browser — The custom Chromium build (C++/Python)
Quick Links
Ways to Contribute
Report bugs — Open an issue with steps to reproduce, expected vs actual behavior, and screenshots. Suggest features — Share ideas on GitHub or Discord. Improve docs — Docs live indocs/ and use Mintlify. Edit pages and update docs/docs.json for navigation.
Path 1: Agent Development
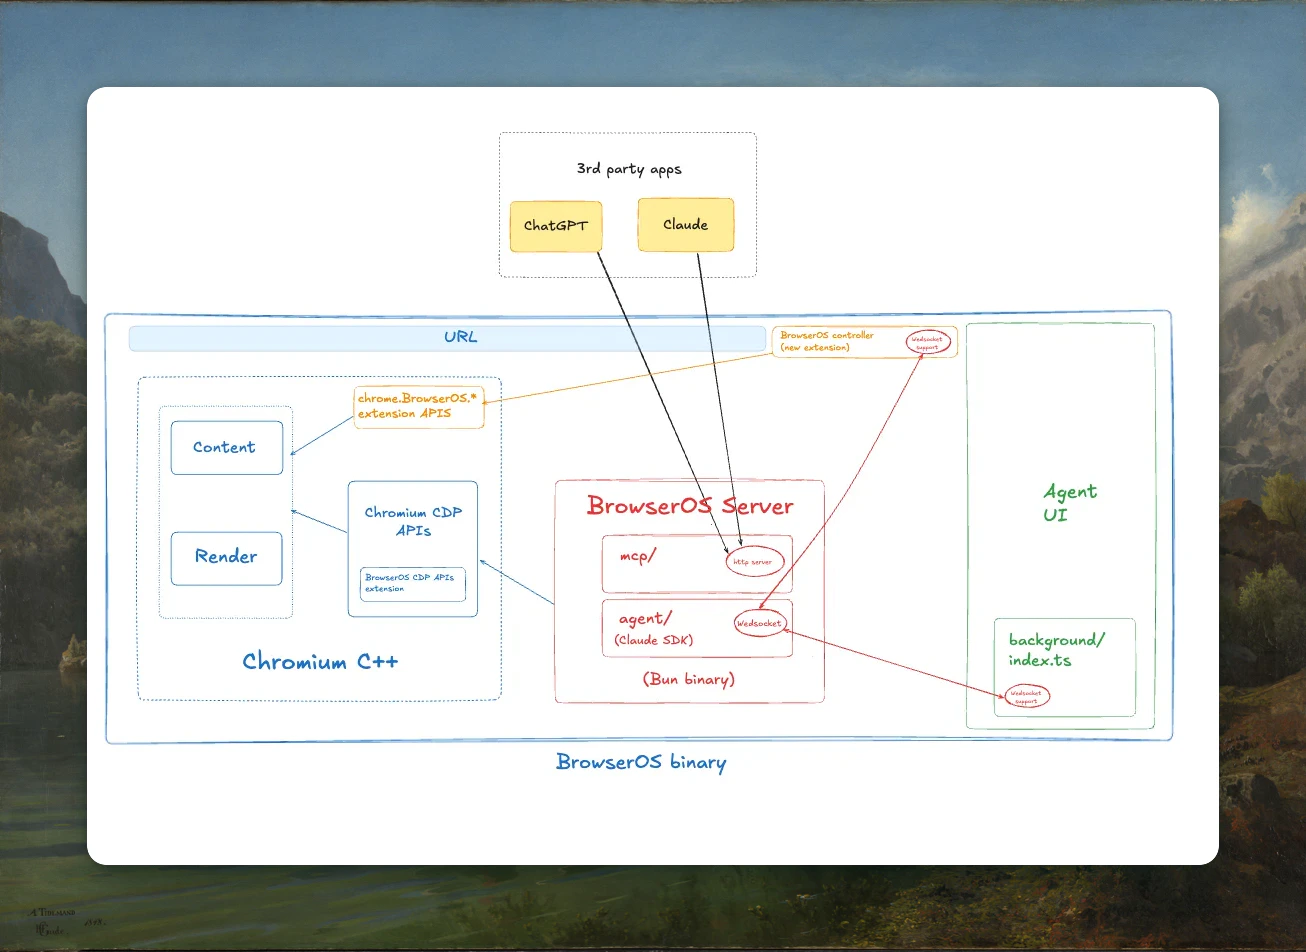
The Agent is a monorepo with 3 components:Architecture
Setup
Running Locally
- Go to
chrome://extensions/ - Enable Developer mode
- Click Load unpacked and select the
apps/app/dist/folder
Commands
Path 2: Browser Development
Only go down this path if you’re working on Chromium-level features like patches to the browser itself. Requirements:- ~100GB disk space
- 16GB+ RAM recommended
- 3+ hours for first build
Prerequisites
- macOS
- Linux
- Windows
- macOS with Xcode and Command Line Tools
- Python 3.12+
- UV (Python package manager)
- Git
Build Instructions
1. Clone Chromium source Follow the official Chromium: Get the Code guide. This sets updepot_tools and fetches ~100GB of source code.
Note the path where you clone it (e.g., ~/chromium/src).
2. Install UV and dependencies
--setup and --prep flags are only needed for the first build. After that, just use --build for incremental builds:
- macOS (ARM64)
- macOS (x64)
- Windows
- Linux
Build Flags
Troubleshooting
Build fails with missing dependencies — Make sure you followed all steps from the Chromium build guide for your platform. Out of disk space — Chromium needs ~100GB. Check withdf -h.
Build takes too long — Use ccache, more CPU cores, or stick to debug builds.
UV command not found — Restart your terminal after installing UV.
Making Your First PR
- Fork the repository on GitHub
- Clone your fork locally
- Create a branch:
git checkout -b feature/your-feature - Make changes and test them
- Commit:
git commit -m "feat: add your feature" - Push:
git push origin feature/your-feature - Open a PR with a clear description
Sign the CLA
On your first PR, our bot will ask you to sign the Contributor License Agreement. Just comment:Code Standards
TypeScript:- Use strict typing, avoid
any - Use Zod schemas instead of TypeScript interfaces
- Use path aliases (
@/lib) not relative paths (../) - Naming:
PascalCasefor classes,camelCasefor functions
- Tailwind CSS only (no SCSS or CSS modules)
- Hooks at top level only
- Test with Vitest
- Keep functions short (under 20 lines)
- Write tests for new features
- Handle errors gracefully
Getting Help
- Discord — discord.gg/YKwjt5vuKr
- GitHub Issues — github.com/BrowserOS-ai/BrowserOS/issues
- GitHub Discussions — github.com/BrowserOS-ai/BrowserOS/discussions
By contributing, you agree that your contributions will be licensed under AGPL-3.0.